After our first t-shirt rag rug tutorial, I got lots of requests to make a rectangle shaped rag rug. Of course I am happy to make one, because it was so much fun, and a hand-made rag rug looks beautiful in any style home from farmhouse to bohemian to modern.
A little while ago, I discovered a GREAT book on weaving T-shirt rag rug, wall tapestries, and other types of cloth rugs. The author’s passion is totally contagious, and I just have to make not only another rag rug but also a DIY loom!
The whole process of building a simple rag rug loom and weaving a t-shirt rug was so much fun! I will share with you a couple of ways to build your own adjustable loom and some short cuts I learned on how to weave this colorful boho style T-shirt rag rug!
( Some of the helpful resources are affiliate links. Full disclosure here. ) The book that I love so much is called Twined Rag Rugs, by Bobbie Irwin. It is the result of a chance meeting between the author and an 80 year old lady who made magnificent rag rugs. which inspired her life long journey to revive this traditional craft.
She also published another beautiful book called Twist and Twine: 18 Ideas for Rag Rugs and Home Decor.
Materials and tools to make a t-shirt rag rug and a DIY loom:
To make a T-shirt rag rug, first we need to make some t-shirt yarn or any fabric yarn. Here’s our first tutorial on how to make t-shirt yarn and weave a round rug.
Optional but very helpful: this great rotary cutter really speeds up the t-shirt yarn making process, and here’s a cutting mat to use with the cutter!

How to make t-shirt yarn and weave a round rug.
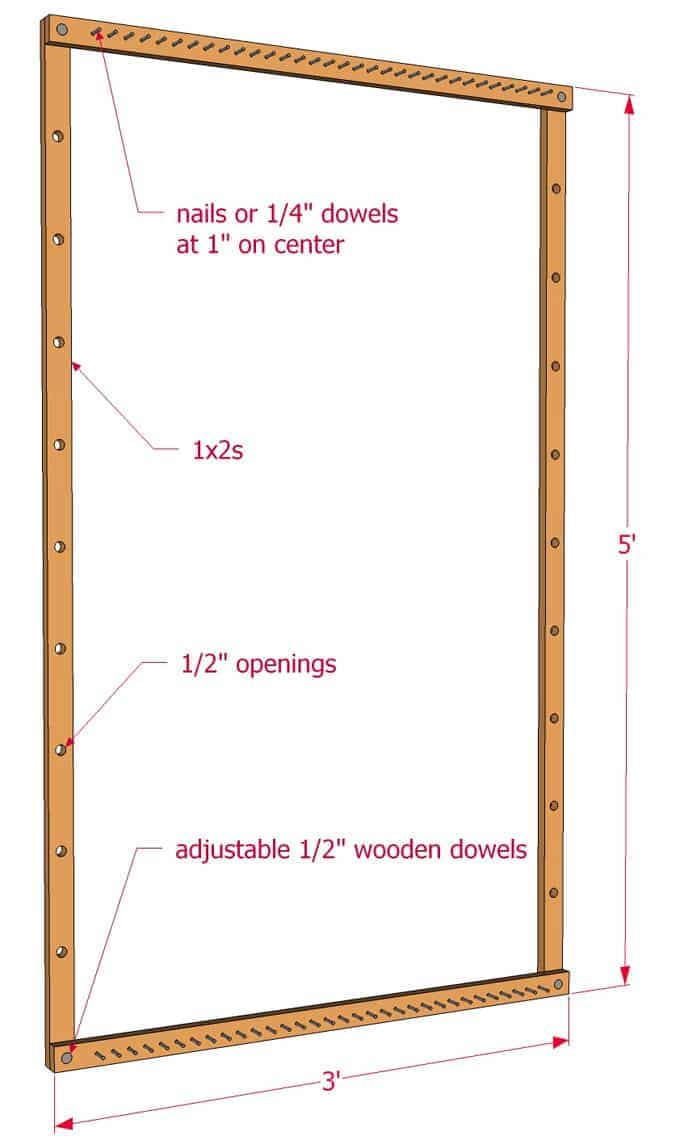
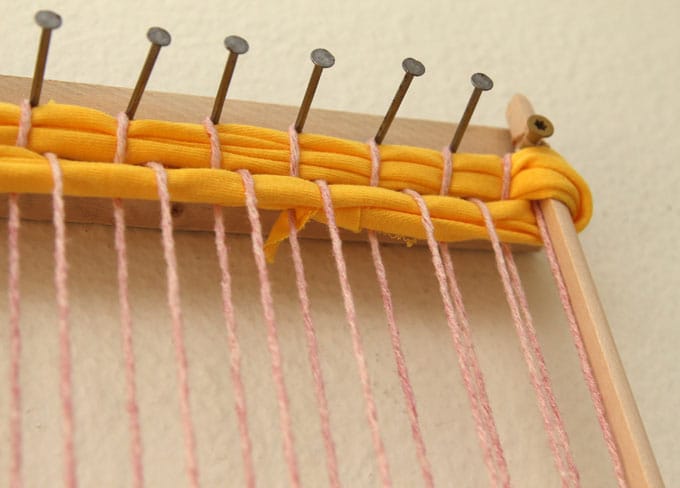
For the DIY loom, you just need a hammer, some wood, 2 wood dowels, and 2 inch flat head nails ( the flat head will keep the yarn in place.
Step 1: let’s build an adjustable rag rug loom!
It sounds so impressive. It is actually really simple.
Build a frame with 1x2s or other scrap wood you have, you can build them any size. Secure the four corners with dowels so the frame is adjustable length-wise.
See plan below-
I did it a little differently. Partly because I have a bunch of 1x2s cut in 12″ sections from this project: Star-shaped cloths drying rack.

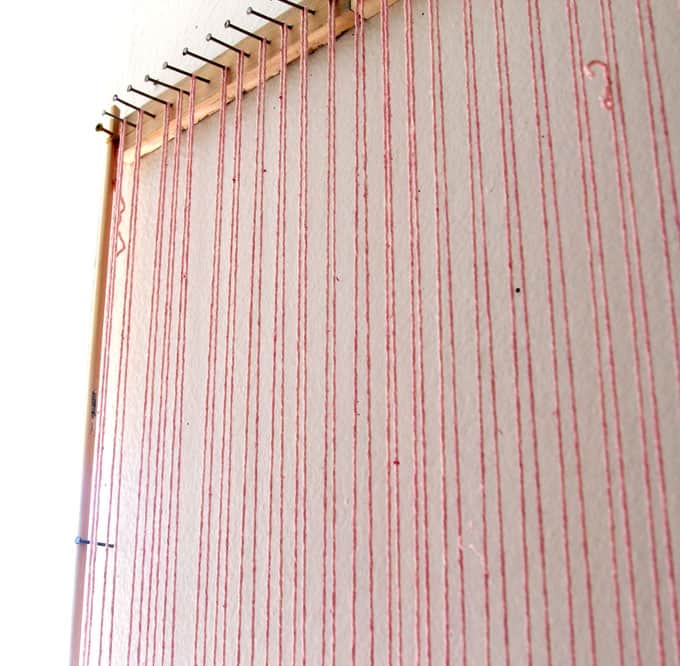
Instead of building the whole frame, I only set up the top and bottom bars, and screwed them into the wall. (If you don’t want holes in your wall, then build the whole frame like shown in the plan!) The nails are spaced at 1″ apart.


It is also important to add two 1/2″ to 3/4″ diameter wood or metal dowels, one on each side of the loom, see photo and description in next step below.
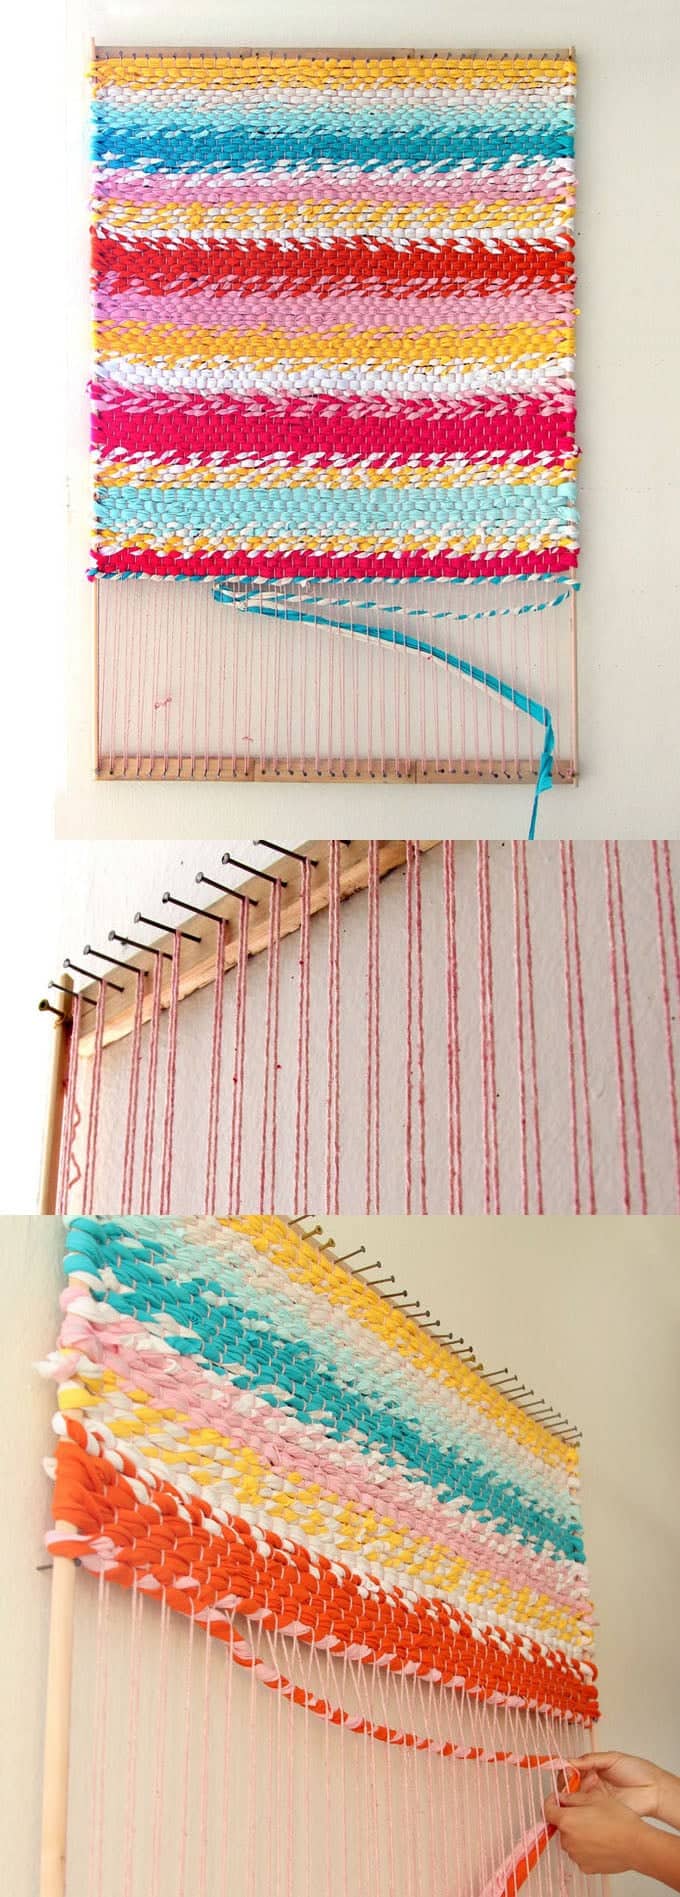
Step 2: Start weaving with continuous warp.
Remember these two words: warp & weft.
Warp: (in weaving) the threads on a loom over and under which other threads (the Weft) are passed to make textile.
You can use string or t-shirt yarn as warp. I used some acrylic yarn.
Tie a loop at the very beginning. Zigzag the warp onto the nails on the upper and lower bars. Tie a loop at the end.

The warp should not be stretched too tight. As we weave, they will be come tighter.
In addition to the frame, you will also need two side “bars” to help the rug stay rectangular as we weave, because the tension will pull the shape towards the center.
I used a piece of quarter round trim piece on each side. Thin metals rods or 1/2″ to 1/4″ wood dowels are popular choices also. Tie a string to secure ends of these bars onto the end nails / screws . We will need to be able to remove the from the rug at the end. See following steps.
I found the tension to be quite strong that the wood trim pieces stated warping. So I added 1-2 extra nails to help them stay straight.
Step 3: Double weft weaving
Take a piece of t-shirt yarn, fold in the middle so you have a double strand.
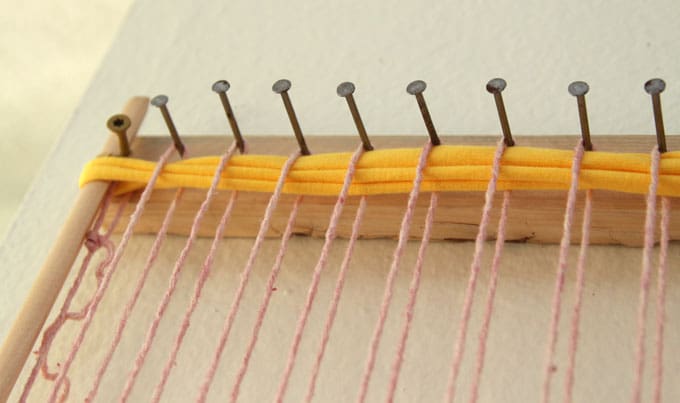
Go through the first loop we tied on the warp like shown above. This is the only tricky part. You can also stitch this spot, or tie a knot- the goal is to prevent the t-shirt rag rug from unraveling at this beginning spot.
Now take the doubled weft and weave it over and under the warp.
In case you missed the definitions – Warp: (in weaving) the threads on a loom over and under which other threads (the Weft) are passed to make textile.
When you reach the end, turn the corner and weave the weft over and under the warp, alternating from the row above.
That’s the basics. Next we will look at how to change colors and create designs in our t-shirt rag rug!
Step 4: Adding colors.
When you reach the end of a piece of t-shirt yarn, just add more using the method in this detailed tutorial on how to make continuous t-shirt yarn.

Because I was weaving with double strands, it was fun to play with combinations of colors.
As you can see from the photos below, I changed the colors from yellow-yellow, to yellow-white, to white-white, etc. The possibilities are endless!
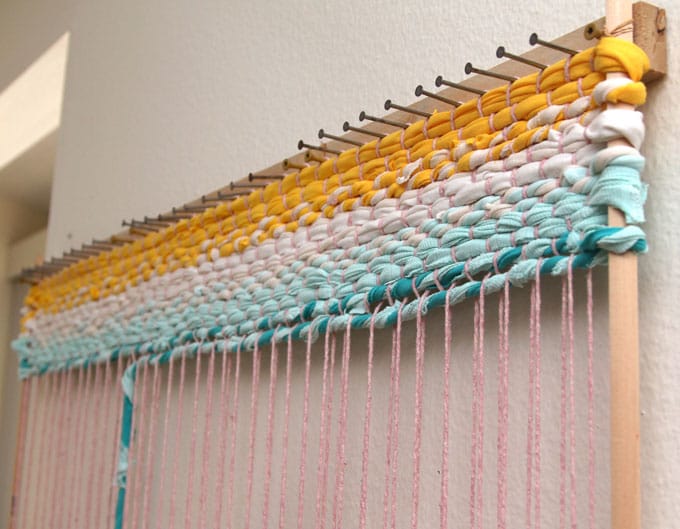
When using two colors, you can create a “peppermint” look by twisting the two color strands as you weave.

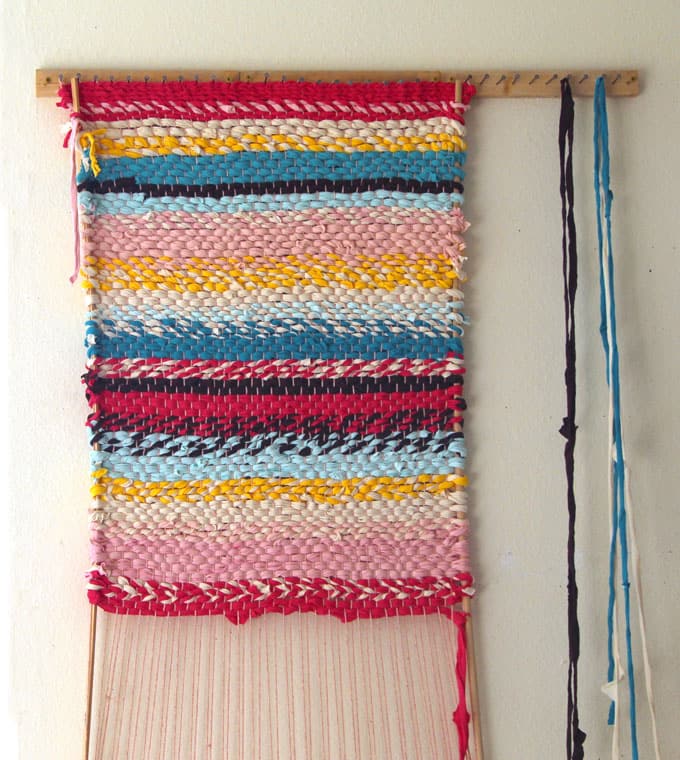
Push each row up as you weave. The rug will stay nice and tight, and you can take a break and come back to it anytime!


Once you reach the desired length on the t-shirt rag rug, remove the warp one section at a time from the bottom bar. Tie a knot as you remove each piece. Slide out the side bars from the rug.


Trim the warp at where we tied the knots. If you weave all the way to the bottom bar, you may not have any extra warp to trim.


Below are some other color combinations. The dark brown color really makes a big difference!

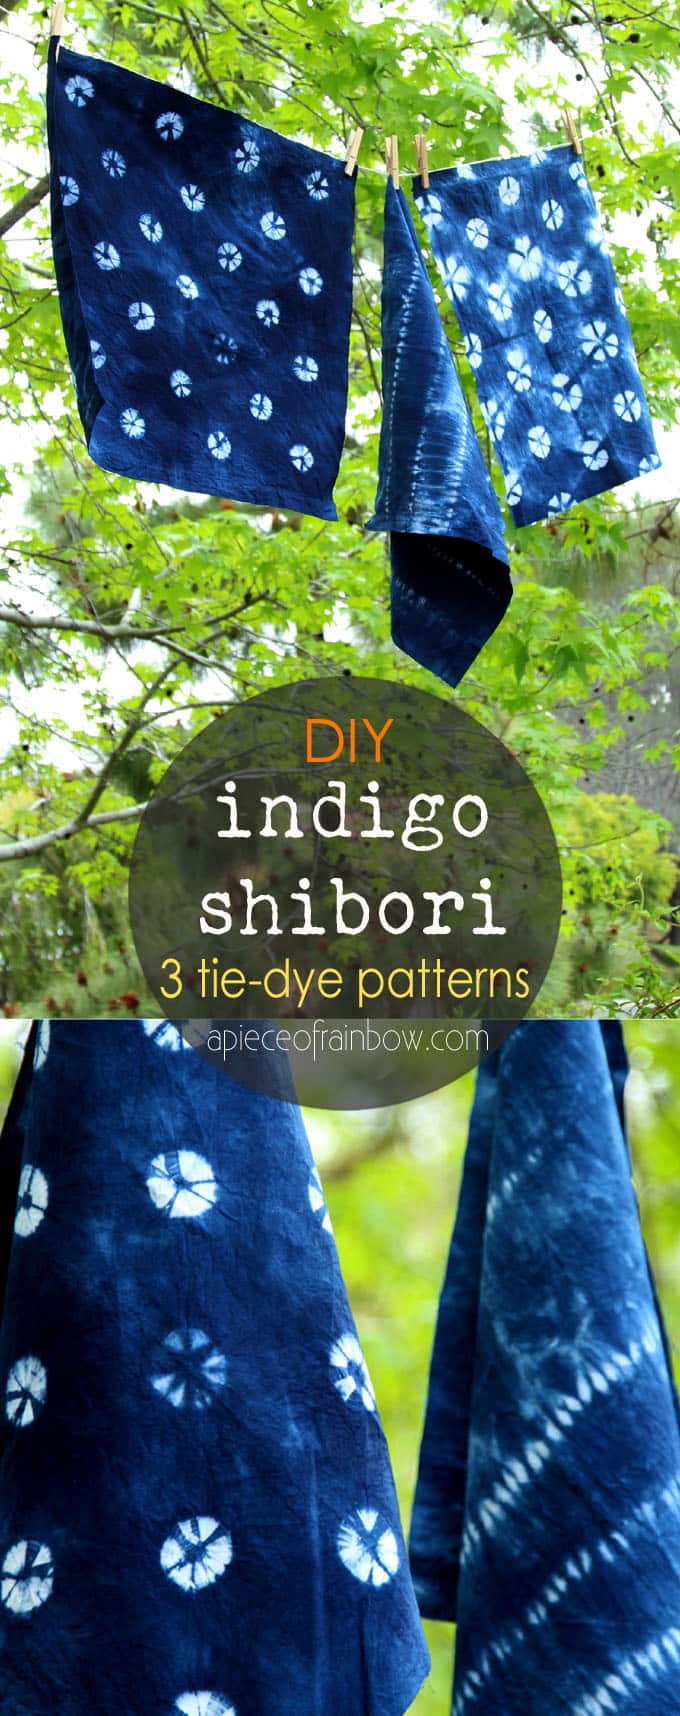
You can also dye white t-shirts to make any colors for your t-shirt rag rug. I can just imagine something beautiful like indigo! Here’s a tutorial on how to make your own indigo tie-dye fabric –
Happy creating!
Source: apieceofrainbow.com
